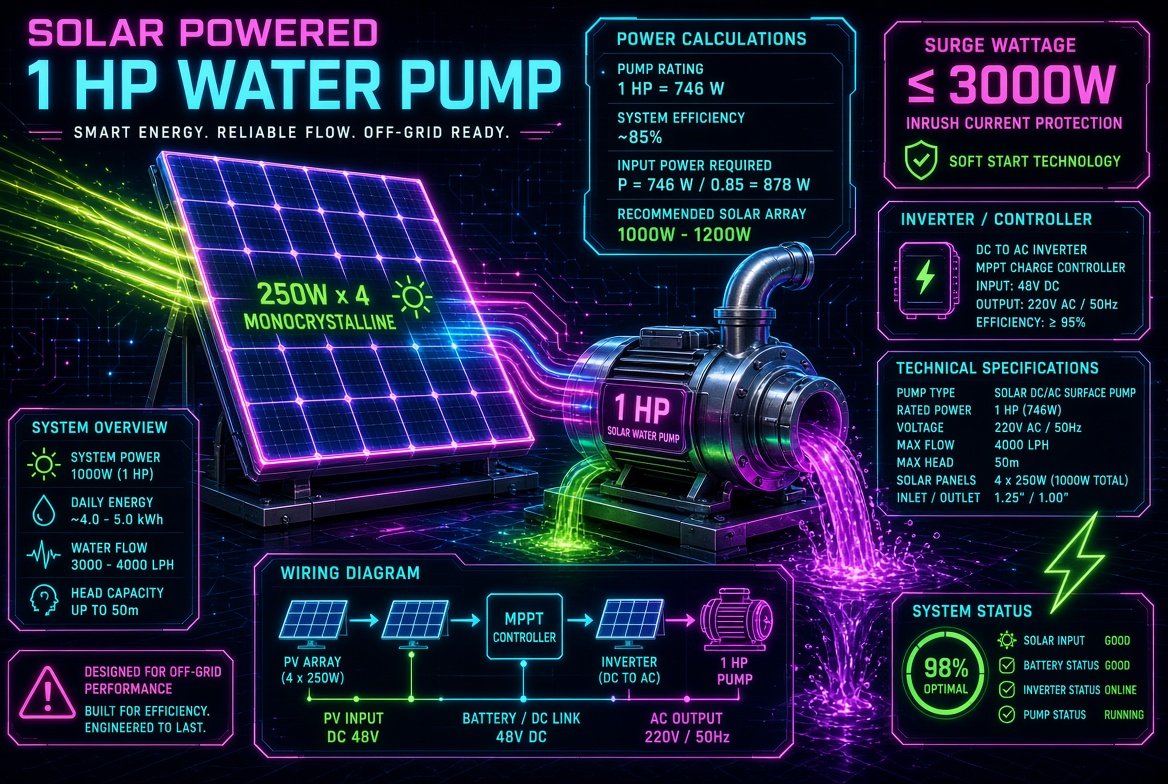
Solar Panel Setup for 1HP Water Pump: Exact Sizing & Diagram (2026 Guide)
A properly designed solar panel system can power a 1HP water pump for agricultural irrigation, livestock watering, or domestic water supply. However, selecting the right equipment requires more than matching the pump’s horsepower to the solar panel output.
A reliable solar water pumping system must account for the motor’s actual electrical consumption, starting current, solar panel output variations, inverter compatibility, and environmental conditions.
As a general starting point, a typical 1HP AC water pump may require approximately 1,200W to 1,500W of solar panels, paired with a compatible solar pump controller or Variable Frequency Drive (VFD). The exact requirements depend on the pump’s nameplate specifications, operating conditions, and controller design.
This guide explains how to calculate the required solar capacity, select compatible equipment, configure panel wiring, and install a reliable solar-powered water pumping system.
1. Understanding the Power Requirements of a 1HP Water Pump
Before purchasing solar panels or an inverter, it is important to understand the difference between a motor’s mechanical output and its actual electrical consumption.
Running Wattage vs. Starting Wattage
One horsepower (HP) is equivalent to approximately 746 watts of mechanical power.
However, an electric motor requires additional electrical power because of efficiency losses and power factor characteristics.
A typical 1HP AC water pump may have the following requirements:
| Parameter | Typical Value |
|---|---|
| Motor rating | 1 HP |
| Mechanical output | 746 W |
| Electrical running input | 800 W–1,000 W |
| Potential starting demand | 2,000 W–2,500 W |
| Recommended initial PV capacity | 1,200 W–1,500 W |
These figures are indicative rather than universal. Actual running power and starting current must be determined from the motor nameplate or manufacturer documentation.
Why does a water pump need additional starting power?
Induction motors can draw several times their normal running current when starting directly across the supply. This temporary demand is known as starting or inrush current.
An undersized inverter may trip, shut down, or fail to start the pump.
A suitable solar pump VFD can gradually increase motor speed, reducing the high starting-current demand associated with direct-on-line starting.
Calculating Solar Panel Losses and Efficiency
Solar panels rarely deliver their full rated output throughout the day.
Actual electricity generation depends on several factors:
- Solar irradiance and weather conditions.
- Panel temperature.
- Dust and surface contamination.
- Panel orientation and tilt.
- Cable resistance and electrical connections.
- Controller conversion efficiency.
For preliminary system sizing, it is reasonable to allow approximately 25%–40% additional PV capacity above the pump’s electrical running demand.
For example, if a pump consumes 900W:
900W × 1.4 = 1,260W
This gives an initial solar array target of approximately 1,260W.
However, this is a planning estimate, not a guarantee of continuous operation. The final design must also satisfy the pump controller’s minimum voltage, maximum voltage, current, and power requirements.
2. How Many Solar Panels Are Needed for a 1HP Water Pump?
For a typical 1HP water pump, an initial solar array capacity of approximately 1,200W to 1,500W is a reasonable starting point.
The number of panels depends on their individual wattage.
Recommended Solar Panel Configurations
| Panel Rating | Number of Panels | Total PV Capacity |
|---|---|---|
| 330 W | 4 | 1,320 W |
| 400 W | 4 | 1,600 W |
| 450 W | 3 | 1,350 W |
| 500 W | 3 | 1,500 W |
| 540 W | 3 | 1,620 W |
These configurations illustrate total panel capacity only. They do not establish the correct electrical string configuration.
Before connecting panels, check the controller’s permitted DC input voltage, MPPT operating range, maximum input current, and maximum PV power.
Series vs. Parallel Solar Panel Wiring
Solar panels can be connected in series, parallel, or a combination of both.
Series connection
When panels are connected in series:
- Their voltages add together.
- Current remains approximately the same.
- Higher voltage can reduce cable losses over longer distances.
Parallel connection
When panels are connected in parallel:
- Voltage remains approximately the same.
- Their currents add together.
- Higher current requires appropriately sized cables and protection.
The correct configuration depends on the solar pump controller’s electrical specifications.
Important: The combined open-circuit voltage (Voc) of a series string must remain below the controller’s maximum DC input voltage, including the increase in panel voltage under cold conditions.
3. Essential Components of a 1HP Solar Water Pumping System
A complete solar pumping installation requires several compatible electrical and mechanical components.
Solar Pump Controller or VFD Inverter
A conventional off-grid inverter is not always the best choice for operating a water pump.
A dedicated solar pump controller or solar-compatible VFD is generally preferable because it can:
- Convert variable solar DC power into suitable motor power.
- Track the solar array’s maximum power point (MPPT).
- Gradually accelerate the motor.
- Adjust pump speed according to available solar energy.
- Provide motor overload and protection functions.
For a 1HP motor, a suitably specified 1.5kW drive may be an appropriate starting point, but its rated output current, voltage, phase compatibility, and overload capacity must be checked.
Do not select a VFD based on horsepower alone.
MPPT Controller vs. Battery Storage
There are two common approaches to solar-powered water pumping.
Option 1: Direct Solar Pumping
A direct-drive system connects the solar array to a compatible solar pump controller, which supplies power to the pump.
Its main advantages include:
- No battery bank required.
- Lower initial equipment costs.
- Reduced battery maintenance.
- Efficient daytime water pumping.
- Lower system complexity.
Instead of storing electricity, water can be pumped into an elevated storage tank for later use.
This approach is particularly suitable for irrigation and applications where water demand can be scheduled during daylight hours.
Option 2: Battery-Backed Solar Pumping
Battery storage is useful when water must be pumped after sunset or during periods of insufficient sunlight.
A typical configuration includes:
- Solar panels.
- MPPT solar charge controller or compatible hybrid inverter.
- Battery bank.
- Pure sine wave inverter.
- Appropriate motor protection and switching equipment.
A 24V or 48V battery system may be used, depending on the equipment and power requirements.
For a 1HP pump, the inverter must support the motor’s running demand and starting characteristics. A 2.5kW–3kW inverter may be a preliminary selection, but actual suitability must be verified against the pump’s starting current and inverter surge specifications.
Battery capacity should be calculated from the required pumping duration, not simply the motor’s horsepower.
4. Electrical Protection: Breakers, Surge Protection and Grounding
Electrical protection is essential for the long-term reliability and safety of a solar water pumping system.
The installation should include:
- DC circuit breakers or isolators – Provide appropriately rated DC switching and overcurrent protection between the solar array and controller.
- DC Surge Protection Device (SPD) – A suitably selected Type 2 DC SPD can help protect the system against transient voltage surges. Its voltage rating must be compatible with the maximum possible PV string voltage.
- AC protection – Install appropriate AC-side isolation, motor protection, and overcurrent protection according to the controller and motor manufacturer’s requirements.
- Earthing and grounding – Properly earth the equipment frames, panel mounting structures, and electrical system in accordance with applicable electrical codes.
- Cable protection – Use suitable outdoor-rated solar cables, connectors, and enclosures designed for the installation environment.
Protection equipment must be selected according to the system voltage, current, installation method, and local electrical regulations.
5. Step-by-Step Solar Pump Installation and Wiring Guide
A correctly installed system improves performance, reduces electrical losses, and helps prevent equipment damage.
Step 1: Select the Panel Mounting Location
Install solar panels where they receive maximum unobstructed sunlight.
Consider:
- Appropriate panel orientation for the geographical location.
- Tilt angle based on latitude and seasonal requirements.
- Minimal shading from buildings, trees, and other structures.
- Adequate ventilation behind the panels.
- Accessibility for cleaning and maintenance.
Even partial shading can significantly reduce the output of a solar panel string.
Step 2: Calculate the Solar Cable Size
Cable size depends on:
- Maximum operating current.
- Total cable length.
- System voltage.
- Permitted voltage drop.
- Installation temperature.
- Cable insulation and installation conditions.
For smaller installations, 4mm² or 6mm² solar cable may be suitable in some circumstances, but these sizes should never be treated as universal recommendations.
Calculate the actual cable requirements before installation.
Step 3: Verify Solar Panel Voltage
Before connecting the PV array to the controller, verify the electrical characteristics.
Use a suitable multimeter to check:
- Open-circuit voltage (Voc).
- Polarity.
- String configuration.
- Voltage compatibility with the controller.
Never connect a solar string if its voltage exceeds the controller’s maximum permitted input.
PV circuits can remain energised whenever the panels are exposed to light.
Step 4: Configure the Solar Pump Controller
Configure the controller using the motor’s actual nameplate specifications.
Typical parameters include:
- Rated motor voltage.
- Rated motor current.
- Rated frequency.
- Maximum operating frequency.
- Acceleration and deceleration time.
- Motor protection limits.
- Dry-run protection, if supported.
- Minimum operating voltage.
Incorrect motor parameters can result in overheating, poor performance, or premature equipment failure.
Step 5: Test the Complete System
Once installation and configuration are complete, conduct a controlled commissioning test.
Monitor:
- PV voltage and current.
- Controller input and output power.
- Motor operating current.
- Pump starting behaviour.
- Water flow rate.
- Discharge pressure.
- Motor and controller temperature.
Test the system under different sunlight conditions to establish its actual operating range.
6. Frequently Asked Questions
Can a 1HP Water Pump Run on a 1kW Solar System?
Yes, a 1kW solar array may operate some 1HP pumps under favourable sunlight conditions, particularly when using a compatible solar pump controller.
However, the system has limited power headroom. High panel temperatures, cloud cover, and motor operating requirements can reduce performance.
A 1.2kW–1.5kW array is a more practical initial design target for many standard 1HP applications.
The final capacity should be determined from actual pump and controller specifications.
What Size Inverter Is Required for a 1HP Water Pump?
The answer depends on the type of inverter and motor.
For a conventional off-grid inverter, a 2.5kW–3kW pure sine wave model may be a reasonable starting point for evaluation.
However, its surge rating and duration must be sufficient for the pump’s starting requirements.
For direct solar pumping, a compatible solar pump VFD rated appropriately for the motor is generally a better solution.
Can Solar Panels Run a Water Pump Without Batteries?
Yes.
A direct-drive solar pumping system can operate without batteries by using a compatible MPPT solar pump controller.
The pump runs when sufficient solar power is available.
For applications requiring water outside daylight hours, an elevated storage tank can provide a practical alternative to electrical battery storage.
How Many Hours Can a 1HP Solar Water Pump Operate?
Operating hours depend on solar irradiance, panel capacity, pump efficiency, water head, and the required flow rate.
A properly designed system may operate for several hours during daylight, but the actual daily pumping duration must be estimated using local solar-resource data and pump performance specifications.
Is a VFD Necessary for a Solar Water Pump?
A VFD is not mandatory for every solar pump installation, but a dedicated solar pump controller with suitable MPPT and motor-control functionality is generally recommended for AC motor applications.
It helps manage variable solar power and can reduce motor starting stress.
The controller must be compatible with the motor type and electrical configuration.
Conclusion
Designing a reliable solar panel setup for a 1HP water pump requires careful matching of the solar array, motor, controller, and electrical protection equipment.
A solar array of approximately 1,200W–1,500W is a useful starting point for many installations. A compatible solar pump VFD with MPPT functionality can improve performance by adjusting motor operation to available solar power.
For the most reliable results, base the final design on the pump’s actual nameplate data, controller specifications, required water flow, and total pumping head.
A correctly sized direct-solar system can deliver dependable daytime water pumping without the cost and maintenance associated with battery storage.
Related Reading
- What Size Solar Inverter Do I Need?
- Can Data Centres Run on Solar Power Alone?
- How Many Solar Panels to Power a Data Centre? Formula and Size Table